Data Science
Machine learning & data science for beginners and experts alike.- Community
- :
- Community
- :
- Learn
- :
- Blogs
- :
- Data Science
- :
- ⚡ Lightning Fast Document Processing using the Bar...
- Subscribe to RSS Feed
- Mark as New
- Mark as Read
- Bookmark
- Subscribe
- Printer Friendly Page
- Notify Moderator
If you are a loan admin, auditor, or back-office staff that is required to scan an ever-growing amount of documents to subsequently organize them, then this article may just be for you!
Scanning documents and indexing them can be time-consuming and sometimes necessary, given the business function and domain. Banks, lenders, and auditors are tasked with imaging and organizing customer-submitted documents such as credit applications, deposit forms, and other trust/tax documents. Adding barcodes to those documents can speed up the indexing process of the scanned documents considerably.
✅ Ready to do this using Intelligence Suite? Download the Intelligence Suite Trial and Starter Kit today!
Document indexing is tagging a document in a way that facilitates search and retrieval. Scanning and indexing are two separate processes, however you can’t have one without the other. An index is a necessary component to complete a digital conversion, but how can we add indices to a group a documents? It’s simple, create documents with an encoded QR code that shows the document type, type of business, or any other taxonomy that can help you automate processing! Let's now see how Designer’s Intelligence Suite Computer Vision tools can help!
Source: GIPHY
How to Make a Barcode: Creating QR Codes using the Barcode Tool
Alteryx Capital is a fictitious lender that has decided to “capitalize” on the benefits of saving manual user typing hours by automating document processing and indexing using the Barcode tool ✨.
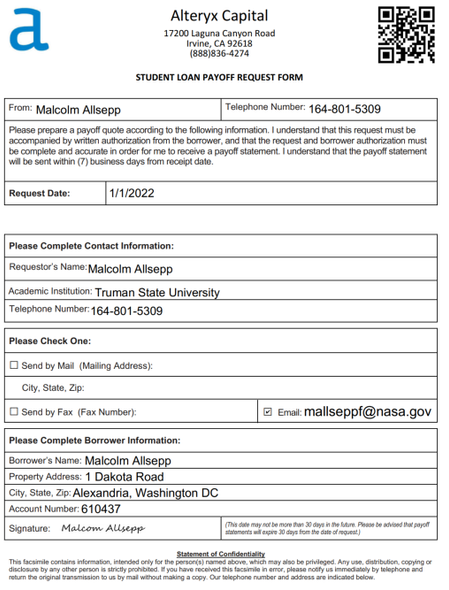
Alteryx Capital provides both student and personal loans, and as a result the lender typically deals with two types of forms for each line of business: Loan Applications and Payoff Request forms.
Personal Business Forms

Student Business Forms

Using only a limited amount of tools on canvas we can create a workflow that will generate a QR code for each form and make that document processing and indexing stress free! However, first order of operations is bringing in the PDF forms.
I can do this by using a Directory tool and navigating to where my forms are saved, and specifying that I’m interested in only retrieving PDF files.
Directory Tool Configuration Panel
After connecting the directory tool to the Image Input tool, which is a very easy way to enter images into Designer, I will then enter the file path as “Full Path” in the configuration panel. Subsequently, I will connect it to the D anchor of the Image to Text tool, where the optical character recognition (OCR) magic happens!
However, I will not want to OCR the entire form, only certain sections of it. As such, I will connect the Image Template tool to the T anchor of the Image to Text tool.
Our workflow will encode the document type unique for each line of business (student and personal). E.g. If I’m dealing with a loan application form for personal use, then I will call it a “Personal Loan Application Form” and encode this text in the form’s QR code.
The personal loan application form already has the title in the text, and thus as a next step I will markup or annotate the title of the form and save it as a field called “Document Type”. I do this using the Image Template tool.
Annotating the title of the form within the image template tool
Now it's time to add the Barcode tool to the workflow, where I will select “generate barcode from text” and will specify the column that contains the text, in this case its “Document Type”. Lastly we specify the barcode type, QR.
All workflows will be available below in the Alteryx Gallery for you to download!
Designer workflow for encoding a barcode and adding it to a document form
We then add some of the Reporting tools to generate a PDF using the Render tool and obtain our form that is now ready for distribution! Notice the below form’s shiny new QR Code 🤩
We perform this same process for the rest of the other three document types or forms. And now all forms can be filled out by applicants or current customers.
Personal Loan Application Form with QR Code for stress-free indexing
Hot Tip 🔥: Did you know you can add an image to the center of the QR code for style and still be able to read the codes? This is possible given that QR codes are structured to have built-in redundancies so that they can be read even if a section is missing. Check it out for yourself and checkout the attached gallery workflow that shows how to do it! Go ahead and point your phone camera to see that it reads just fine 😁

Reading QR Codes using the Barcode Tool
Now that we have created and added a QR code to each of our forms, it is now time to reap the indexing automation benefits as they return filled out by applicants and customers!
Don’t worry, what you are seeing below is NOT personal information, it is only fake data 😉


Given that we have already created QR codes on the forms, we can now save all incoming forms previously filled-out in a specific folder that will be retrieved using the Directory tool. We then use the Select tool to restrict sending over only the Full Path to the Image Input tool. Now we obtain the Barcode tool and specify we want to “Read Barcode from Image”, as well as the column that contains the image. The output field that will contain the deciphered text from the barcode is by default called “decoded”.
Next, we leverage the Filter tool to see if the decoded field contains the document type in question. If it does, it gets processed accordingly by leveraging the Image to Text tool (for OCR) aided by the Image Template tool.
We then union the results using the Union tool, remove unwanted characters such as leading and trailing whitespace as well as punctuation marks using the Data Cleansing tool. Lastly, we use the Formula tool to standardize the “Full Name” field and use a Table tool from the Reporting palette to show the output.
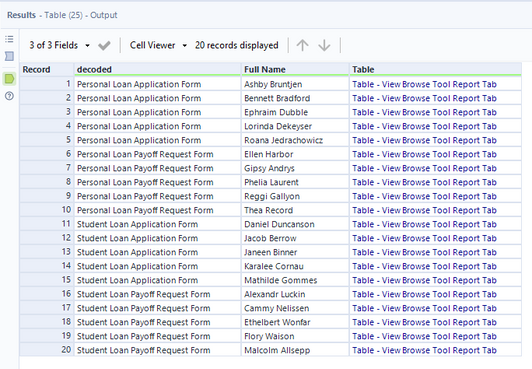
The results show the 20 forms (5 forms were created for each document type for simplicity purposes) that were processed quickly and efficiently using a combination of tools within the Computer Vision palette! 🎉
Table Results showing the QR code decoded text and the PDF extracted information
Conclusion
As you can see it is very simple to create and add your barcodes to your forms and documents. This not only is a time saver, but can free up capacity to work on other perhaps more interesting projects by automating your tasks away! Its very simple to do so please give it a go! And do reach out if you have a question.
Try it yourself
If you would like to try out this workflow tutorial:
- Download a trial version of Alteryx Intelligence Suite if you don’t already have it here.
- Download the workflows “Add_Barcodes”, “Read_Barcodes” and “Add_Barcode_with_Logo_in_Middle” from Gallery.
- Load the “Add_Barcodes” Workflow:
- Unzip the Folder called “Add_Barcodes”
- Open Add_Barcodes.yxmd in Designer
- In the directory tool, navigate to where the below pdf file is stored: Alteryx_Capital/Personal_Loan_Application_Form/”Alteryx Personal Loan Application Form.pdf”.
- In the image template tool, upload the “Alteryx Personal Loan Application Form.pdf” and import the respective annotations file “Personal_Loan_Application_Annotation.json” within that same folder
- Run the workflow
- Load the “Read_Barcodes” Workflow:
- Unzip the folder called “Read_Barcodes”
- Open Read_Barcodes.yxmd in Designer
- In the directory tool, navigate to where the All_Forms folder is stored and retrieve all pdfs stored in that folder: Read_Barcodes/All_Forms
- Upload a corresponding filled-out form and respective annotations file for each of the four image template tools. E.g. If the Filter tool contains decoded text such as “PERSONAL LOAN APPLICATION FORM”, then upload that document type and respective annotations in that “Personal Loan Application Forms” folder. For this example, respective annotations are called “Personal_Loan_Application_Read_Annotations.json”
- Run the workflow
- Load the “Add_Barcode_with_Logo_in_Middle” Workflow:
- Unzip the folder called“Add_Barcode_with_Logo_in_Middle”
- Run the workflow
Additional resources on the AIS tools:
You must be a registered user to add a comment. If you've already registered, sign in. Otherwise, register and sign in.


