Engine Works
Under the hood of Alteryx: tips, tricks and how-tos.- Community
- :
- Community
- :
- Learn
- :
- Blogs
- :
- Engine Works
- :
- Alteryx + Snowflake = Mind-blown Speeds!
- Subscribe to RSS Feed
- Mark as New
- Mark as Read
- Bookmark
- Subscribe
- Printer Friendly Page
- Notify Moderator
- Introduction
- The Use Case
- The Solution
- Step by Step Guide to Writing Snowflake Merge Statements
- Part 1 – Tables & Primary Keys
- Part 2 – Matched Statement
- Part 3 – Not Matched Statement
- Part 4 – Drop the Temporary Table
- Conclusion
- Handy Tip
Introduction
One of my topics for INSPIRE EMEA 2022 this year is about updating data within Snowflake at speed. This three part blog series is going to lead you right into INSPIRE this year.
If you find yourself waiting for the UPSERT functionality using the output tool takes too long, you are in the right place. This blog is going to share with you all how you can utilise what Snowflake provides and what Alteryx provides to give you ultimate power! (As Tim the Toolman Taylor would say)
Source: GIPHY
So instead of being an Al Borland, waiting around, let’s strap in and learn some stuff about our favorite tools.
Source: Twitter
C’mon Al it will be fun and so rewarding I promise! 😃
Two topics we need to understand are UPSERT and MERGING and the differences between the two.
UPSERT is when you are updating data that already exists within the database and you are using a primary key to do so, in Alteryx this is done by transaction size in the Output Tool to ensure that the data is managed carefully, and nothing is dropped. It will call the API with the first chunk of data, update it and then send a message back to Alteryx to say all is complete, next set of data please. And so on… until the end of file. Depending on your data size and transaction size, this can take a long time.
MERGING is the ability to update data that already exists within your database using a primary key(s). You don’t send the data up in sections using Alteryx, you send the whole file up and get Snowflake to do the hard work for you. The outcomes are exactly the same just the method is slightly different.
The Use Case
The Use Case: As a retailer we need to keep on top of third-party datasets daily, we receive files that require updating in databases. However, the files are becoming larger, and the reports need to be ready first thing. With the new datasets the time it currently is 3 hours using output tool with UPSERT. The data is available from 08:30 am and the reports need to be ready for 9am. HELP!
For this kind of demonstration: I love to use Geolytix Open Supermarkets dataset. They create a fabulous dataset for use within modelling across the UK. It can be downloaded here: UK Retail Points.
Our use case, we have around 17K points from the Geolytix Retail Points and I would like to update the dates on them. I fix the date and then I try to update them with Alteryx, this seems to take a long time, by calculations of doing 100 every minute (ish) it would take hours to update my data.
17000/100 = 170 (packets) around 1 minute per packet, so hours = 170/60 = 2.83 hours ~ 3 hours!
There must be a better way! Don’t worry there is 😊
The Solution
So, let’s think about this differently and bulk push the whole data up into a temp table, then MERGE the data on the primary key using Snowflake’s merge functionality. We then have the best of both worlds. Snowflake takes care of all that hard work matching the data up and inserting when the data is new to ensure we have a great clean dataset at the end.
The result: we have completed our data update which used to take HOURS in around 11 seconds.
Source: GIPHY
That’s great, so how do I do it?
Well, the one thing we must learn is how to write Snowflake MERGE statements within Alteryx. So here is a handy guide...
Step by Step Guide to Writing Snowflake Merge Statements
- I have the original table in Snowflake named Geolytix_Retail_Points_Merge
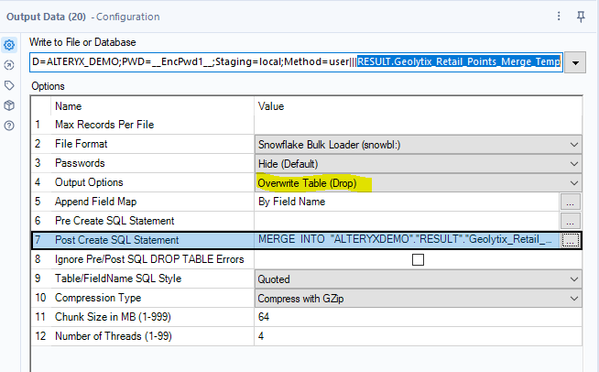
- I write the data up to the snowflake database using the same table name but add the following suffix “_Temp” and set the output option to be Overwrite Table (Drop) using the bulk loader option for speed.
- I add a MERGE statement in the Post Create SQL Statement
The MERGE statement is a story of 4 parts:
Part 1 – Tables & Primary Keys
You need to tell snowflake the tables you are working with. I recommend using aliases here to make your life easier, this is where you give your table name a shorthand reference to use throughout your SQL code. 😉
Examples of an alias in the code below would be t1 or t2, it appears directly after the table name.
The two tables we are using in my example are:
MERGE INTO Database.Schema.Geolytix_Retail_Points_Merge t1 --your production table
Using Database.Schema.Geolytix_Retail_Points_Merge_Temp t2  --your updated data
On t1.ID = t2.ID
If you have more than one primary key, no problem, you just need to add a comma and then the next primary key and so on. i.e. t1.ID = t2.ID, t1.ID2=t2.ID2
Part 2 – Matched Statement
When we have a match on our primary key i.e., when t1.ID = t2.ID what do you want the merge statement to do?
Ideally you want it to update the fields you want updating… here you can expand your logic as far as you want but I personally just need the whole row updating.
WHEN MATCHED THEN UPDATE SET
t1.RETAILER = t2.RETAILER,
t1.FASCIA = t2.FASCIA,
t1.STORE_NAME = t2.STORE_NAME,
t1.ADDRESS_LINE1 = t2.ADDRESS_LINE1,
t1.ADDRESS_LINE2 = t2.ADDRESS_LINE2,
t1.ADDRESS_SUBURB = t2.ADDRESS_SUBURB,
t1.ADDRESS_TOWN = t2.ADDRESS_TOWN,
t1.ADDRESS_COUNTY = t2.ADDRESS_COUNTY,
t1.ADDRESS_POSTCODE = t2.ADDRESS_POSTCODE,
t1.LONG_WGS = t2.LONG_WGS,
t1.LAT_WGS = t2.LAT_WGS,
t1.BNG_E = t2.BNG_E,
t1.BNG_N  = t2.BNG_N,
t1.PQI = t2.PQI,
t1.OPEN_DATE = t2.OPEN_DATE,
t1.SIZE_BAND = t2.SIZE_BAND
Part 3 – Not Matched Statement
When we have no matches, we then want to insert the data into the table. Normal SQL insert statements follow the pattern of:
Insert (into these columns) values (from these columns)
Don’t forget those aliases!
(t1.production_table / t2.temp_table)
WHEN NOT MATCHED THEN

INSERT (t1.ID, t1.RETAILER, t1.FASCIA,  t1.STORE_NAME, t1.ADDRESS_LINE1, t1.ADDRESS_LINE2, t1.ADDRESS_SUBURB, t1.ADDRESS_TOWN, t1.ADDRESS_COUNTY, t1.ADDRESS_POSTCODE, t1.LONG_WGS, t1.LAT_WGS, t1.BNG_E, t1.BNG_N, t1.PQI, t1.OPEN_DATE, t1.SIZE_BAND)

VALUES (t2.ID, t2.RETAILER, t2.FASCIA,  t2.STORE_NAME, t2.ADDRESS_LINE1, t2.ADDRESS_LINE2, t2.ADDRESS_SUBURB, t2.ADDRESS_TOWN, t2.ADDRESS_COUNTY, t2.ADDRESS_POSTCODE, t2.LONG_WGS, t2.LAT_WGS, t2.BNG_E, t2.BNG_N, t2.PQI, t2.OPEN_DATE, t2.SIZE_BAND);
Part 4 – Drop the Temporary Table
This is a simple clean up step to keep database administrators happy, we delete the _Temp table, so that everything is ready for the next update.
Drop Table Database.Schema.Geolytix_Retail_Points_Merge_Temp;
Put it all together into your PostSQL statement box and you now can update at speed. Try it with a basic table first while you get yourself familiar with the concept then bookmark this page for reference, as you will be back. 😉
Conclusion
This blog is about the need for speed and utilising the right technology at the right time. By handing over the updates to Snowflake within Alteryx, we are dramatically improving the time it takes to update existing data in a database.
We would love for you all to try this in your organisations, if you are snowflake users, and let us know the before and after time in the comments. It would be great to see the impact this has had for you all.
And that is not all, tune in same time next week where we can use this method for bulk uploading spatial data into Snowflake!
Yes, you heard me right! 😄
Handy Tip
Snowflake doesn't like the max string size in Alteryx, so when writing data, be sure to check your data types first and adjust those with size of 1073741823 to the actual size of your data. Unsure what to change it too, try using the Auto Field tool.

CGeog | ACE Emeritus | Sales Engineering
Samantha is well known for sharing her knowledge and evangelising Alteryx with new users both in her role as a Sales Engineer and at INSPIRE. Her passion lies with making every day business chaos, simple and automated giving people hours back in their day jobs and personal lives. With over 15 years experience in data, she enjoys solving puzzles, spatial analytics, writing blogs and helping others develop themselves into gurus like herself.
Samantha is well known for sharing her knowledge and evangelising Alteryx with new users both in her role as a Sales Engineer and at INSPIRE. Her passion lies with making every day business chaos, simple and automated giving people hours back in their day jobs and personal lives. With over 15 years experience in data, she enjoys solving puzzles, spatial analytics, writing blogs and helping others develop themselves into gurus like herself.
You must be a registered user to add a comment. If you've already registered, sign in. Otherwise, register and sign in.


