Blog Archive
Archived Blogs- Community
- :
- Public Archive
- :
- Blog Archive
- :
- Jupyter Flow Basics Guide
This article has been archived. Please visit this article for the most up-to-date information: https://help.alteryx.com/current/en/designer/tools/laboratory/jupyter-flow.html#jupyter-flow
Welcome to the Jupyter Flow Basics guide! If you're well versed on Jupyter and python virtual environments, you may consider the Jupyter Flow Help docs instead, which cuts straight to the chase. Or you may want to skip to section V in this guide! Visit Introducing the Jupyter Flow tool for an introduction to the tool and it's capabilities.
Here you will learn how to install Python, manage virtual environments, create and integrate Jupyter notebooks into Alteryx workflows, export and share those workflows, and run them on Server. Sections I through IV are intended for users who have no experience with python, virtual environments, Jupyter, or creating Jupyter notebooks.
Before starting this guide, make sure you have Alteryx Designer version 2020.4 or later, and have installed Jupyter Flow onto your system.
Note: the following guide uses Windows command line arguments. These arguments will be different depending on the operating system you’re using.
I. Install Python 3.8.5
You can skip this step if you already have python 3.8.5 installed, or you already have a preferred method to create python installs. Simply note that this tool has only been tested with Python 3.8.5 environments.
-
Download the correct Python installer for your system
-
Follow the instructions to install Python 3.8.5
-
Open a new command prompt and type “python” and press “Enter”. If you get a python interpreter like this, you can skip steps 4 through 6:
-
Find out where python was installed
-
If installed as a user, you may find it at "C:\Users\your_username\AppData\Local\Programs\Python\Python38\"
-
-
Add this path to your user PATH environment variable
-
If you would prefer not to add this to your PATH, simply use the full path to python for the rest of this guide.
-
Everywhere in this guide you see the following code, replace python with your version of the full path to your installed python version (ex: "C:\Users\your_username\AppData\Local\Programs\Python\Python38\python.exe"):
python <<some_commands>>
-
II. Create and Configure a Virtual Environment
You can skip this section if you already know how to create a virtual environment and add packages to it using pip.
- Open a new command prompt
- Create a new folder in which to store your virtual environments:
mkdir my_envs
- Navigate into your new folder:
cd my_envs
- Create a new virtual environment:
python -m venv first_environment
- See your new environment by listing folder contents:
dir
- Install pandas package into the new environment:
first_environment\Scripts\pip.exe install pandas
Note: If you would like to pass data to/from Alteryx workflows and your notebook, you will need to use pandas at this time. Notebooks can run without Pandas, but the only way to pass data in/out of a notebook currently is via pandas.
III. Install and Run Jupyter Notebook
You can skip this step if you already know how to use Jupyter. Simply note two things: DLL kernel errors may be fixable by installing pywin32==300 in the environment you use to run Jupyter, and you should install jupyter_client 6.1.12 if installing jupyter in your environment.
- In your environment, install jupyter:
first_environment\Scripts\pip.exe install jupyter jupyter_client==6.1.12
- There is currently a bug in Jupyter which can be fixed by running the following command:
first_environment\Scripts\pip.exe install pywin32==300
- Open Jupyter
first_environment\Scripts\jupyter.exe notebook
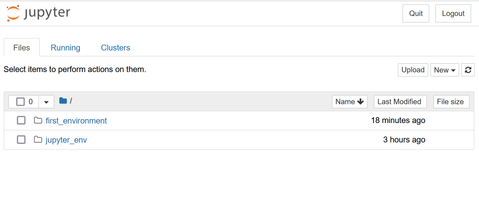
- If the previous command succeeded, you should see the Jupyter notebook page in your default browser:
IV. Create a Simple Jupyter Notebook
You can skip this step if you already know how to create and run Jupyter notebooks.
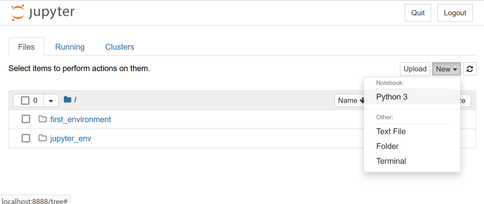
- Click "New" -> Python3
- You should now see an empty notebook
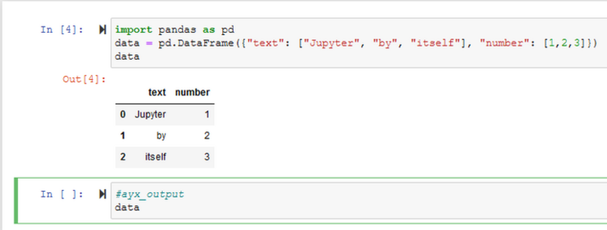
- Add the following code to the notebook:
import pandas as pd
data = pd.DataFrame({"text": ["Jupyter", "by", "itself"], "number": [1,2,3]})
data - Run the notebook. You should see something like this:
- In the last field of the notebook, type the following command and run the cell:
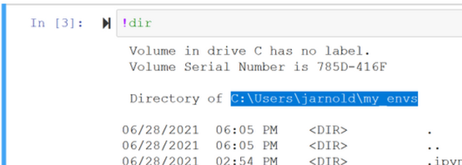
!dir
- You should now see the following output. Copy the directory path and save it for later:
- Select "Untitled" at the top of the notebook to change its name:
- Give your notebook a name and click "Rename":
- Save the notebook using ctrl+s
- If you would like to know more about Jupyter, see the jupyter website
V. Run a Jupyter Notebook from an Alteryx Workflow
Summary: After specifying a notebook and site-packages, the tool will build an environment for the notebook to run in, and then run the notebook. The environment only builds the first time a new set of packages are specified, but can take some time. If the packages or versions thereof change, the environment will build again.
- Open Alteryx Designer and open a new workflow
- Find the Jupyter Flow tool in the search bar or Laboratory and drag the tool to the canvas:
- The bare minimum of things you must provide to the tool are the notebook and the environment packages
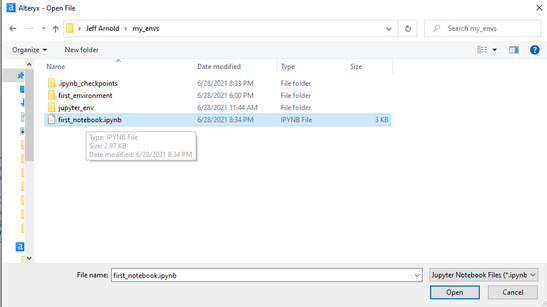
- Click the Browse button next to the "Notebook" field and paste the notebook's directory name (saved previously) into the navigation bar and press "Enter":
- Select the notebook previously created and click "Open":
- Back in the configuration pane, click the "Browse" button next to the "Packages" field. Navigate to your environment's Lib/site-packages folder and click "OK":
- The configuration pane should now look something like this:
- Run the workflow
- The first time Jupyter Flow runs with a new environment, you will see a message indicating that the environment is building. The amount of time this takes varies greatly depending on the size of your site-packages folder. Once your environment has been built, this step will no longer occur unless the environment changes.
- My first run took 2 minutes and 24 seconds:
- Run the workflow. Now that the environment has been built, the environment build step is gone. My second run took 3.9 seconds:
- Note that there is not yet any data passing through the notebook. This is only useful If you want to schedule your notebooks but do not care about passing Alteryx data into or out of them. Read on to find out how to connect Alteryx data to your notebook!
VI. Pass Data Through your Notebook
Summary: Adding #ayx_input=<<name of alteryx input connection>> above a variable assignment will replace that variable with a dataframe representation of the data flowing through the input connection specified. Adding #ayx_output=<<output anchor number>> above a variable or a variable assignment will output the variable (assuming it's a pandas dataframe) to the specified output anchor in the workflow.
- Open the Jupyter notebook
- Add a cell to the bottom of the notebook with the following code and save the notebook:
#ayx_output
data - The notebook should look like this:
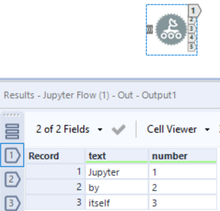
- Run the workflow
- Select the first output anchor of the tool. It should show the following outputs:
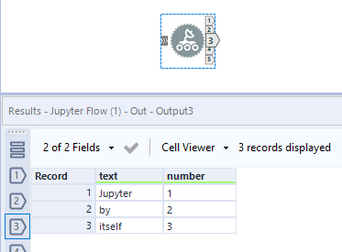
- In the Jupyter notebook change "#ayx_output" to "#ayx_output=3" and save:
- Run the workflow
- Select the third output anchor of the tool. It should show the following outputs and the first anchor should no longer have any outputs:
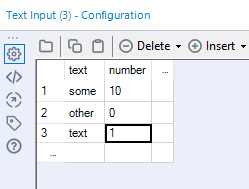
- Drag a TextInput tool to the canvas and configure as follows:
- Connect the TextInput tool to the input anchor:
- In your notebook, add "#ayx_input" above the assignment of "data" and save the notebook:
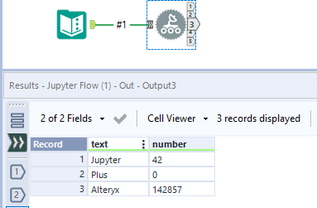
- Run the workflow
- The third output anchor should now contain the data from the Text Input tool:
- Add a new TextInput tool and configure as shown:
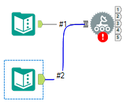
- Connect the TextInput tool to the input anchor:
- The input tag must now specify which connection to use.
- Open the Jupyter notebook and change "#ayx_input" to "#ayx_input=#2":
- Run the notebook again
- The third output anchor should show data from the second Text Input tool:
- Moonbuggy can make use of multiple inputs at the same time. Simply use the "#ayx_input=" tag plus the name of the input connection.
VII. Share Your Jupyter Workflow
Summary: Using Alteryx Designer's built-in export workflow feature will export all of the assets required for another user (or a Server) to run a workflow containing this tool. The environment packages will be exported inside the .yxzp file.
- In the configuration pane, deactivate the "Packages" toggle:
- Save your workflow
- Navigate to Options -> Export Workflow:
- Ensure your notebook (.ipynb file) and the zip app (.pyz file) are selected in the "Export Workflow" dialogue:
- Click "Save"
- You may now share the exported ".yxzp" file with anyone else who has the Jupyter Flow tool installed on their machine.
VII. Run Your Jupyter Workflow from Server
- In the configuration pane, deactivate the "Packages" toggle as shown in the "Share your Jupyter Workflow" section.
- Ensure the tool has been installed on your desired gallery instance
- Using your preferred method, save your Jupyter workflow to your gallery
- Run the workflow on Server just like any other Alteryx workflow
Banner image by Beate Bachman
-
Analytics
1 -
Customer Advocacy
1 -
Developer
3 -
News
1 -
Partners
1 -
Platform | Product
1 -
Python
1 -
Release | New Feature
1 -
SDK
2

