Data Science
Machine learning & data science for beginners and experts alike.- Community
- :
- Community
- :
- Learn
- :
- Blogs
- :
- Data Science
- :
- Compare PDF Files Using Computer Vision: Uncover E...
- Subscribe to RSS Feed
- Mark as New
- Mark as Read
- Bookmark
- Subscribe
- Printer Friendly Page
- Notify Moderator
Most of the time, people are honest. It is typically the exception rather than the rule when people try to sneak modifications into a supposedly final contract.
I once worked for a company that processed most sales online with digital signatures, but the large, crazy complex deals could necessitate months of negotiations and 50-page (or larger) PDF files that were sent to customers for someone to print, sign (with a pen), scan, and send back to the company. It was critical that these large contracts contain zero handwritten markups from the customer since they needed to be countersigned by the company and counted as final agreements.
Nobody enjoys scrolling through 50 pages one at a time to visually inspect system-generated content for the rare changes crossed out or added with a pen. How can this tedium be automated?
Enter Intelligence Suite with its Computer Vision collection of building blocks.
This tool collection enables you to connect to PDF files (and other image files like JPEG, PNG, and BMP), adjust an image with functions like alignment, cropping, and general image cleanup, and then do things like collect data about an image or apply a template for extracting text. The Computer Vision tools also include options to generate and read barcodes and QR codes. You can also build an image recognition model to classify new images based on trained data.
✔️ Ready to do this using Intelligence Suite? Download the Intelligence Suite Trial and Starter Kit today!
For my challenge in comparing an original document to one with potential handwritten markups, I used image processing and image profiling, plus a bit of data prep. All those steps are covered in detail in Part 1 (this blog). Additional image processing plus reporting steps were combined to produce a report of the marked up pages, and those steps have been separated into a Part 2 blog.
The Workflow
I wanted to give you the steps of comparing an original document with a revised document, along with the search for any pages with handwritten markups. So, I built a workflow that does that, and this workflow produces a report that lists only the pages that have system-identified markups. (After all, if you’re dealing with a 50-page contract someday and only three pages have markups, it will be more efficient to see results with three pages instead of 50.)
The Data
Wanting a sample data source that is publicly available, I used the Alteryx Designer end user license agreement (EULA). I downloaded the 6-page document from this URL and saved it as a PDF file named Original Alteryx EULA v20 2006.pdf.
Then I printed the EULA and added markups in red ink to pages 3 and 4. I scanned that printed/marked up document to a new PDF file and named it Signed Alteryx EULA with Markups.pdf (attached at the bottom of this article). You might notice I refer to a “signed” document, but this data is a EULA, and it doesn’t actually have a signature page. Just pretend it’s a 50-page contract with a signature page. Okay? I have a whole other blog planned that will be dedicated to showing how you can automatically determine whether a signature exists. I opted to pretend that my original and “signed” documents were all the pages that came before the signature page.
What’s important to know for the data setup is that there are two different PDF files involved, each with the same number of pages, and the pages are ordered in the same sequence.
Here’s a closeup of page 3, comparing the original on the left to a markup on the right.
Results
When the workflow is run and the final output can be inspected, we can see that the results put the entire original and marked up pages 3 and 4 side by side for comparison.
Page 4 only had a tiny change with the word “not” written in the right column. It’s pretty nifty that this was caught!
Here are the steps taken to sus out the pages with handwritten markups.
Step 1 – Get the Data
With Image Input, you can point to a single folder that holds both PDF files of interest. (The workflow is designed to use only two files, so keep that in mind when you try this with your own data. It might not work so smoothly if you have more than two files in the folder.) Image Input uses OCR technology, so it treats each page like a separate image.
Step 2 – Convert Color to Black and White
I made the markups in red ink, but the workflow performs more reliably when color is converted to black and white. Therefore, Image Processing can be used for the black and white conversion.
Actually, a set of three steps are used to achieve the optimal black and white image.
- First, Brightness Balance gets set to -77 to make the text darker
- Your document might benefit from a different brightness level, but mine likes this
- In general, a negative number makes for a darker image
- Then, Grayscale is used to convert color to, well, shades of gray
- Finally, Binary image thresholding is used to reduce stray pixels
- This helps when a bit of shadowing results as an artifact from the scanning equipment
Step 3 – Profile and Arrange the Pages
Next, at a high level, I used the Image Profile tool to add fields that describe the metadata in the images. The pages got arranged side by side, and then a series of steps eliminated duplicates. Along the way, a Test field got created and dropped.
When we last left our workflow, the Image Input step created a new field named [image], and the Image Processing step created another new field named [image_processed].
This step begins with using Image Profile to reveal all kinds of metadata about the image.
Image Profile needs to be pointed at the field holding the processed image. It comes with profiles of metadata fields, which default to “Select All.” I was in search of the bright pixel counts and didn’t care about any other metadata, so I changed the radio button to “Only Include Selected Profiles” and used the dropdown list to pick the Base set.
|
Tool |
Configuration |

|

|
Once that ran, I got a bazillion (okay 17) new fields. I only wanted one of those new fields, [Bright_Pixel_Count], so I used a Select tool to drop the rest.
Here’s what I kept:
- file (resized to 100)
- page (renamed to Page)
- image (renamed to Original Image)
- Bright_Pixel_Count
Resizing makes the [file] field size smaller and is a best practice, and renaming [page] to [Page] and [image] to [Original Image] is a cosmetic change that improves field name consistency. ‘Cause I’m like that.
What’s critical at this point is to restructure the data from a single list of all pages from both PDF files to a list that is only as long as one PDF file, with image and pixel count fields from the original and signed documents positioned on the same row per page.
This is what I have.
This is what I want.
To get what I want, I start by joining the data to itself.
I used the Join tool and joined on the [Page] field, unselecting the checkbox next to [Page] from the right join.
|
Tool |
Configuration |

|
 |
There are four possible combinations of joining two files together, and two out of four combinations join the same file to itself. That means I ended up with 4 combinations of 6 pages = 24 rows after the join.
|
File 1 |
File 2 |
|
Original contract |
Original contract |
|
Signed contract |
Signed contract |
|
Original contract |
Signed contract |
|
Signed contract |
Original contract |
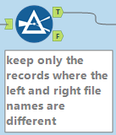
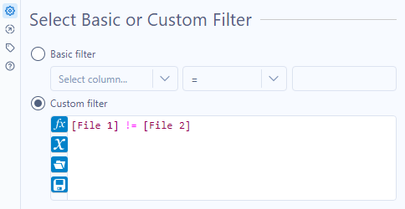
That’s why my next step was to use a Filter tool to get rid of the rows where [File 1] and [File 2] both look at the same file.
|
Tool |
Configuration |
|
 |
Now I’ve only got 12 records rather than 24. Yay!
If you look closely, you’ll see that each page holds a pair of the same data. For example, records 1 and 2 look at Page 4. The original and signed files swap places between [File 1] and [File 2], between [File 1 Original Image] and [File 2 Original Image], and between [File 1 Bright Pixel Count] and [File 2 Bright Pixel Count]. So, I need a mechanism for dropping one of the two rows, and I need to drop the same row of each pair.
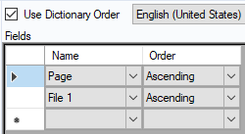
That is why I sort the rows by [Page] and [File 1]. They appear to be in order, frankly, but I want to be sure that future data are also in order. So, I add a Sort tool.
|
Tool |
Configuration |

|
 |
Now I can use the Unique tool to keep only the row per [Page].
|
Tool |
Configuration |

|
 |
Finally! I have one row per page, and each row contains original and signed variations of the file names, images, and bright pixel counts.
It’s time for the exciting part.
Step 4 – Test for Markups
The test establishes a ratio, treats whether each page exceeds a threshold, then keeps only the pages that did because they are likely to have markups and should be reviewed by a person.
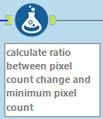
The ratio is a simple one. It starts with the absolute value of bright pixel counts, where one page is subtracted from the other. Then it divides that number by the smaller of bright pixel counts between the two pages.
|
Tool |
Configuration |
 |
 |
Why use a ratio when you could look at the raw numbers?
The reason is that there could be significant variations between the original contract’s image sizes and the signed contract’s image sizes per page because it’s likely that the original contract was merely printed while the signed contract was printed and then scanned. A ratio “normalizes” that difference, stopping one side from “winning” simply because they’re a lot bigger.
One more formula provides simple text in the new [Test for Markups] field to point out which row likely holds handwritten notes (a markup) and which row does not.
|
Tool |
Configuration |
 |
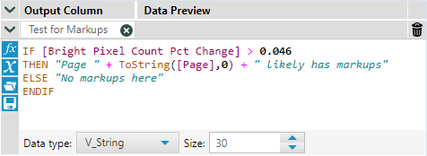 |
As you may remember, pages 3 and 4 hold markups in the signed contract. My test correctly identifies those pages.
It looks like 0.046 is a reliable threshold for this document to distinguish original pages from pages with markups. Anything above 0.046 has markups. Anything below 0.046 does not.
Finally, a basic filter sets [Test for Markups] to not equal the phrase “No markups here.”
|
Tool |
Configuration |
 |
 |
Now I have my culprits! Pages 3 and 4 have markups (most likely), and I caught them with math!
I don’t know about you, but I’m feeling pretty proud of myself.
At this point, the heavy lifting has been done. The workflow has (correctly) identified the pages with handwritten markups. My former employer wondered if there was a means of automating the manual review of a signed contract to see whether a customer added handwritten markups, notes, or scribbles to the non-signature pages or not. It turns out there is a way, and now you have it, too.
Now you can borrow/adapt the techniques to apply to your data.
This stage of the workflow has the answer, but the format is rather basic. Don’t you think? Look out for part 2 next week to see the results made pretty.
You must be a registered user to add a comment. If you've already registered, sign in. Otherwise, register and sign in.


