This article is part of the Tool Mastery Series, a compilation of Knowledge Base contributions to introduce diverse working examples for Designer Tools. Here we’ll delve into uses of the Layout Tool on our way to mastering the Alteryx Designer:
The consummate Reporting Tool, the Layout Toolisn’t named after its ability to “layout” your reporting work like Terry Tate, Office Linebacker. No, the name is borrowed from the tool’s core functionality to freely arrange reporting objects in your workflows to fit a templated, “layout,” format to be output by the Render Tool. Giving you the flexibility to organize reporting snippets horizontally or vertically, set the width and height of columns and rows, and to add borders and separators, the Layout Tool is the last requisite step in compiling, formatting, and generating a report in Alteryx - probably to never be made by hand again!
Use the Layout Tool with your reporting objects to…
- Organize reporting elements:

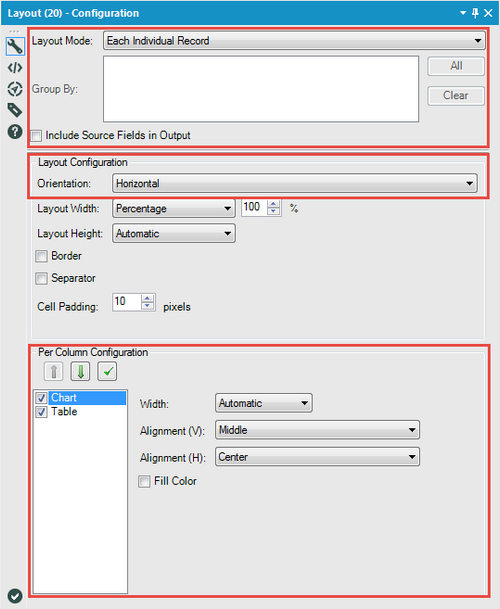
Some reports just have a lot to cover – and that usually means plenty of reporting elements to help get the message across. While the Layout Tool helps to arrange those reporting objects, it may require several Layout Tools to fit your ideal configuration. Using the Layout Tool’s “Layout Mode” will allow you to specify record groupings (if any) to apply the layout template to, while the “Layout Configuration” allows you to specify the arrangement of your input reporting objects as horizontal or vertical. The “Per Column Configuration” then sorts and aligns those reporting objects, before combining the result to a singular reporting object that can be rendered or used for layered formatting in another Layout Tool!
If you’re having trouble getting all of your reporting objects into a single Layout Tool, try using the Union Toolto stack incoming streams of elements!
- Customize reporting elements:

In the “Layout Configuration” menu you also have a few options to change your reporting objects before setting them to your templated format – namely, the ability to add borders, separators, and padding to each reporting element. You can also determine the layout’s width and height. If fixed, choose carefully - this will take priority over individual reporting element size and will force-fit all incoming objects to these layout specifications!
- Create and automate custom reports (and other documents) with graphics, maps, charts, tables, text, and more (attached in the v10.5 workflow Layout.yxzp; can also be found in your Designer Sample Workflows under Help >> Sample Workflows >> Describe what is happening >> Create a report layout):

If you’re having trouble getting your reports exactly to where you want them, be sure to check out our guide on how to arrange reporting objects! Looking to email your reports or presentations after creation? Masterthe Email Toolto automate the process or visit our resource on how to email different reports to different recipients!
By now, you should have expert-level proficiency with the Layout Tool! If you can think of a use case we left out, feel free to use the comments section below! Consider yourself a Tool Master already? Let us know at community@alteryx.com if you’d like your creative tool uses to be featured in the Tool Mastery Series.
Stay tuned with our latest posts every#ToolTuesdayby following@alteryxon Twitter! If you want to master all the Designer tools, considersubscribingfor email notifications.