Engine Works
Under the hood of Alteryx: tips, tricks and how-tos.- Community
- :
- Community
- :
- Learn
- :
- Blogs
- :
- Engine Works
- :
- Scaling a Private Server: Five steps to greater th...
- Subscribe to RSS Feed
- Mark as New
- Mark as Read
- Bookmark
- Subscribe
- Printer Friendly Page
- Notify Moderator
Motivation
In my last post, we discussed the importance of measuring Private Server throughput, using an Alteryx workflow to collect concrete metrics about a Server and use those metrics to guide Server scale out. Although exact performance gains are dependent on many variables (remember, "it depends"), we learned that scaling horizontally by adding additional Queue Workers may have a significant positive impact on total throughput.
In this post, we’ll see just how straightforward it is to expand a Server’s capacity by adding a new Queue Worker. In fact, it requires just five short steps.
Step 1: Provision hardware
The first step in scaling a Private Server is provisioning hardware of sufficient quality to ensure high performance. Using the Alteryx recommendations as a starting point, choose a machine with at least 16 GB memory, 4 physical cores, and, ideally, SSDs.
If possible, prefer physical hardware over virtualized hardware to ensure maximum throughput. If virtualized hardware is your only option, add your new virtual Queue Worker on a Virtual Machine (VM) running on physical hardware that is well within its capacity, and ensure that the VM is dedicated to running the Server only.
Step 2: Collect Controller Token
In order to communicate securely with the Controller, the new Queue Worker needs the Controller Token, which in turn requires Administrator-level access on the Controller.
- To collect the token, log on to the Controller and start the Alteryx System Settings executable. Either run the executable directly, or open Alteryx Designer and choose Options | Advanced Options | System Settings from the main menu.
- Click the Next button in the Alteryx System Settings dialog three times (feel free to click your heels three times as well) to move to the “General Settings” page for the Controller.
- Under “Controller Token” click the Show button to view the Controller Token:

- Highlight the token and copy to the clipboard (Ctrl-C). Cancel the Alteryx System Settings dialog to close without committing any changes.
Step 3: Install Alteryx, datasets and licenses
- On the new Queue Worker, run the Alteryx Server installer. The new machine must have exactly the same version of Alteryx as the Controller it will be connecting to, so use the same installer you used for the Controller.
- It’s also critical to install the same revision of the Alteryx Core Data Bundle as installed on all other machines, as this ensures that the results obtained from running a workflow are consistent regardless of the Queue Worker that processes the workflow.
- This is also a good time to ensure that the new Queue Worker has the correct licenses and data access capabilities such as network paths, databases and ODBC drivers.
Step 4: Configure new Queue Worker
After intalling Alteryx, it's time to configure the new Queue Worker.
- As an Administrator on the new Queue Worker, start the Alteryx System Settings executable. Either run the executable directly, or open Alteryx Designer and choose Options | Advanced Options | System Settings.
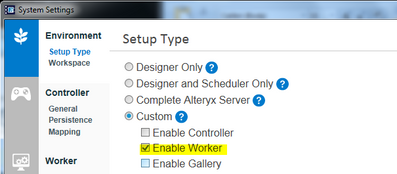
- For "Setup Type" choose Custom, and select Enable Worker:
- Click Next and set your Global Workspace directory as desired (use an SSD if possible):

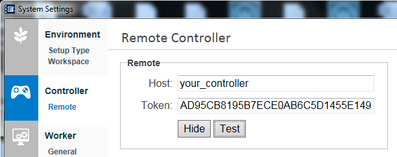
- Then click Next again to move the "Remote Controller" page. Enter the host name or IP of your Controller and the Controller Token. Assuming you are running a remote desktop session, you should be able to paste (Ctrl-V) the Controller Token:
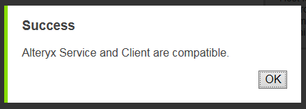
- After entering the Controller Token, press the Test button to verify the new settings. If you receive an error here, double-check the settings (Controller host name and Token) and try again:
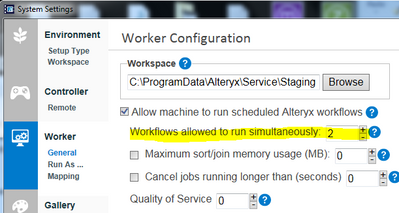
- Click Next again to move on to "Worker Configuration." A good starting point for workflows allowed to run simultaneously is number_of_physical_cores / 2:
- Click Next to move to the "Run As" page. To ensure consistency, the Run-As settings here must match the Run-As settings on your other Queue Worker(s):
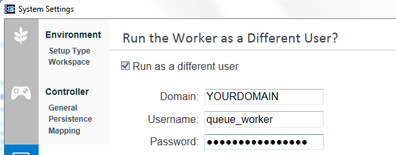
- Finish configuring the new Queue Worker to your satisfaction. Remaining settings include enabling rendering map tiles and configuring Engine-specific parameters such as temporary paths.
Step 5: Verify
The final step in scaling out your Private Server is verifying that the new Queue Worker is retrieving marching orders from the Controller and processing workflows correctly.
- On the Controller, locate the Alteryx Service log file (by default, C:\ProgramData\Alteryx\Service\AlteryxService.log). Open the file in Notepad, scroll to the bottom of the file, and search up for QueueHandler_ReadBody_WorkerCommand and/or the name of your new Queue Worker. The new Queue Worker should be checking in with the Controller, asking for new work:

- You can also verify that the new Queue Worker is running correctly using the Scheduler. In Alteryx Designer, navigate to Options | View Schedules in the main menu, and connect to the Controller. Switch to the "Results" tab and look for jobs completed by the new Queue Worker:

Closing
We’ve seen just how straightforward it is to add capacity to a Private Server, and hopefully your scale-out goes smoothly.
After adding another Queue Worker, how did your Server throughput change? Feel free to share your experiences in the comments, we always enjoy hearing from clients.
Happy New Year to all and thanks for reading. Stay tuned for more Server-related posts in 2016.

Steve is a Distinguished Engineer at Alteryx on the Architecture team, working largely in C++ but dabbling in other languages and technologies. His contributions include backend components of the Alteryx Server, Hadoop connectors (HDFS/Avro), JavaScript integration in both the Designer and Engine (CEF), Spark Direct functionality, Cloud execution for desktop (CEfD), etc. He currently lives on the fringe of Desktop and Cloud, and is committed to bringing our Desktop/Server customers forward into the Cloud.
Steve is a Distinguished Engineer at Alteryx on the Architecture team, working largely in C++ but dabbling in other languages and technologies. His contributions include backend components of the Alteryx Server, Hadoop connectors (HDFS/Avro), JavaScript integration in both the Designer and Engine (CEF), Spark Direct functionality, Cloud execution for desktop (CEfD), etc. He currently lives on the fringe of Desktop and Cloud, and is committed to bringing our Desktop/Server customers forward into the Cloud.
You must be a registered user to add a comment. If you've already registered, sign in. Otherwise, register and sign in.