In early January, Ned posted a blog, "Alteryx API for .NET made easy." He created a new AlteryxAPI.NET.dll which wraps the Alteryx API. It detects if you are running a 64 bit or 32 bit executable and loads the appropriate AlteryxEngine.dll. The only exception to this is if you are running a 64 bit executable and you only have a 32 bit Alteryx installed on your system you will receive an AlteryxAPIException. Ned included a Mortgage Calculator example and a help file for all of the Alteryx API calls.
I thought I'd expand on Ned's example. I want to show you how flexible the C# program can be using some additional Callback Messages from Alteryx.
Create a Wizard in Alteryx
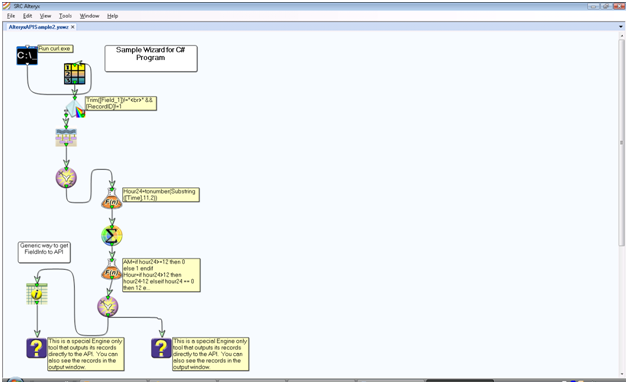
I took one of our current wizard samples "Datetime" and made some modifications to it. I removed the Reporting/Presentation Tools and added the special "Generic" tool that can be used to send output directly to the API without going through the file. The "Generic" tool makes a call to the method AlteryxSrctOutput in the AlteryxBasePluginsEngine.dll.
I also added a "FieldInfo" tool to the end of my process and connected that to a "Generic" Tool. This call is guaranteed to be called before the final data output call in my C# program. The reason I did this was for flexibility. I can change the Alteryx Wizard to return a different number of fields, the same fields in another order, or change the datatype of my fields. I will be able to use this information in my C# program to determine the number of fields in the data, the column headers, and the field types.
Test the wizard with a small amount of data to be sure you are getting out the information you expect. You should make note of the "Generic" Tools ID numbers. You will need to know which tool contains the information for the field information and data output. For this example, Tool #20 is the output and Tool #22 is the field information.
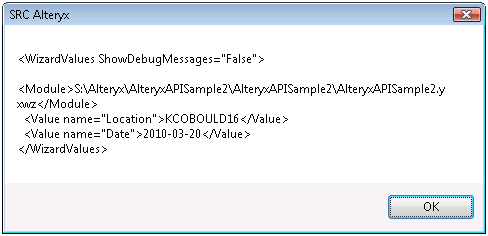
You should also save an example of the XML that the wizard is expecting to change the appropriate values. This can be found by running the Wizard through "Test" and selecting the "Show Values" button. For this example, it is:
The C# Program
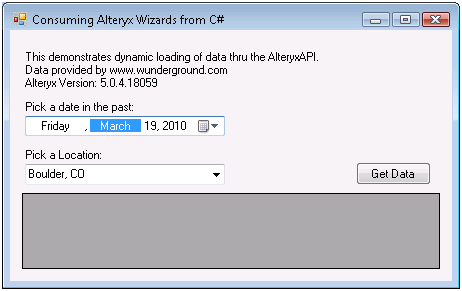
Now that you have your wizard setup in Alteryx it is time to create the C# program. Remember to add the AlteryxAPI.Net.dll to your References. I have a simple form with a DatePicker, a ComboBox of Locations, an empty DataGridView and a "Get Data" Button.
If I had wanted to, I could have hardcoded the DataGridView with the columns and types that I knew were returned from my Alteryx Wizard. However, if I had made a change to my wizard, I would probably have to make changes to my C# program as well. Maybe I could have been more dynamic and taken the column header names from the return of STATUS_OutputFieldNames in the Callback method. (I have an example of that commented out in the example.)
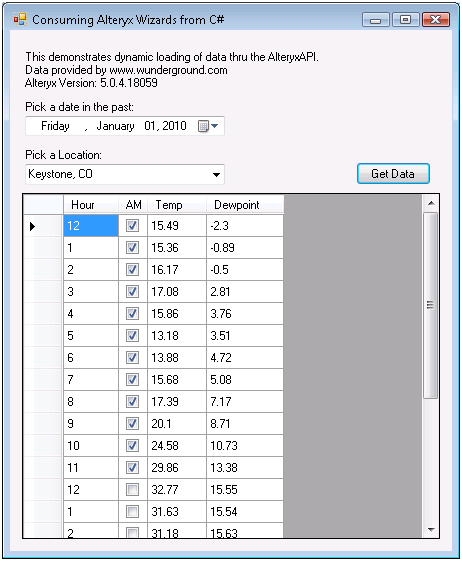
But that still isn't flexible. I don't have a lot of time and I want to create a program that will work with any data returned from my wizard. I chose to add that second "Generic" Tool with the "FieldInfo" in tool number #22. I can use the STATUS_OutputRecord member and check for the Tool #22 and create my DataGridViewColumns the first time through the program. I can treat each datatype and field differently in my code with this method. I haven't hardcoded my DataGridView column types or the order they appear in the DataGridView.
case Alteryx.AlteryxApi.E_CallbackStatus.STATUS_OutputRecord:
{
if (nToolId == 22 && bfirstLoad) // this is the FieldInfo DATA
  {
  // A more dynamic way of figuring out your DataGridView
  // Guaranteed to be a defined size and look like:
  // Name, Type, Size, Scale, Source
  string[] words = pMessage.Split('\"');
  if (words[3] == "Bool")
  {
    // create a checkbox column - Name, Type and Source
    AddNewCheckBoxColumn(words[1], words[3], words[9]);
  }
  else
  {
    // create a TextBox Column - Name, Type and Source
    AddNewTextBoxColumn(words[1], words[3], words[9]);
  }
}
In my example, I used the Column Tag to keep track of the datatype so that I could trim the temperature and dewpoint doubles down to 2 decimal places.
The source code can be downloaded here.